English
 русский
 Español
 عربى
عربى
For most construction and remodeling work, a 3-line or 5-line self-leveling laser level is the most practical starting point. If you regularly set ceilings, partition walls, and full-room layouts, an 8-line or 12-line model saves repeated setups. A construction laser level is a precision alignment tool that projects horizontal, vertical, and cross lines onto surfaces so you can level, plumb, and square elements faster and more consistently than with a spirit level. The key buying factors are line count, accuracy at distance, beam color, mounting options, and whether the unit self-levels or needs manual adjustment.
Content
- What a Construction Laser Level Actually Does
- Line Count: The First Real Decision
- Accuracy, Range, and Visibility: What the Numbers Mean
- Self-Leveling vs Manual: When Each Makes Sense
- How to Set Up and Use a Construction Laser Level Correctly
- Red vs Green Beams: A Practical Comparison
- Common Buying Risks and How to Avoid Them
- FAQ
- Final Thoughts
What a Construction Laser Level Actually Does
A construction laser level turns a laser diode beam into a visible reference line or cross that replaces chalk lines, plumb bobs, and bubble vials for layout and alignment. The tool does not measure distance or detect studs; it gives you a straight, level, or plumb reference that you transfer to walls, floors, and ceilings. Self-leveling models use a pendulum or electronic sensor to find level within a few seconds, while manual models require you to adjust two bubbles before locking the beam. Accuracy is usually stated as something like ±1/8 inch at 30 feet. That tolerance matters because a small error at the tool becomes a much larger gap across a room. For framing, drywall, tile, cabinet installation, electrical runs, and HVAC layout, a laser level reduces the number of people needed and lowers the risk of cumulative measurement mistakes.
Line Count: The First Real Decision
The number of lines determines how many layout tasks you can complete from one setup, and buying too few lines is the most common regret among first-time buyers. A 2-line laser gives you one horizontal and one vertical line. It handles basic leveling and simple tile work, but you will move it often. A 3-line model adds a second vertical line, so you can mark 90-degree corners without turning the tool. This is why 3-line laser levels are popular for kitchen and bathroom remodels, where you need a level line and two square references.
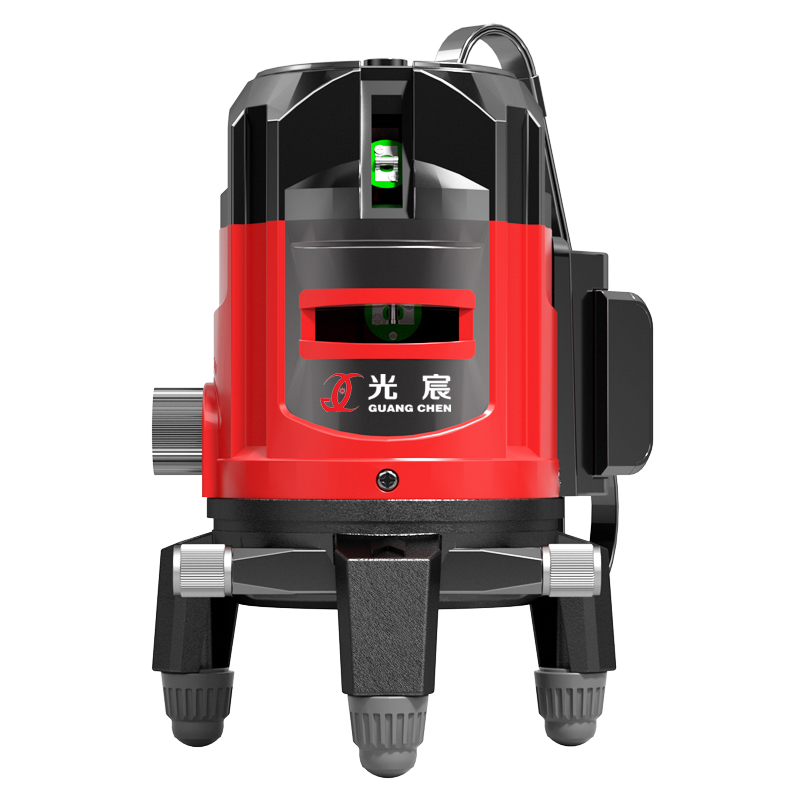 3-Line Laser Level for Layout and RemodelingProjects one horizontal and two vertical lines with three enhancement points, suited to kitchen and bathroom remodels and basic leveling tasks.View Product →
A 5-line model typically provides one horizontal and four vertical lines, or two horizontal and three vertical lines. That extra coverage helps when you are working across several walls or need a ceiling grid. An 8-line laser level projects a wider set of vertical references, so you can mark studs, cabinets, and tile on multiple walls without moving the tripod. On larger rooms, this saves twenty minutes or more per setup.
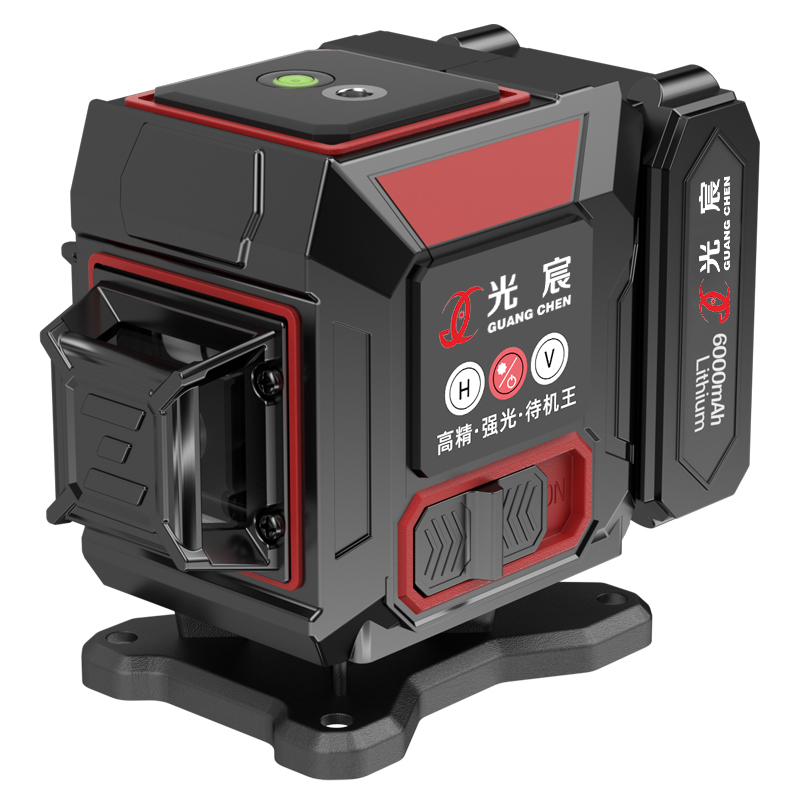 8-Line Laser Level for Full-Room Grid LayoutProjects four horizontal and four vertical lines for wall, ceiling, tile, cabinetry, and installation tasks across larger rooms.View Product →
A 12-line laser level projects a full 3D layout grid, which is useful for commercial fit-outs, suspended ceilings, and rooms with complex angles. A 16-line model adds even more reference planes, but the extra lines only pay off if you actually need them. For a single bathroom or a small deck, a 12-line or 16-line tool is harder to read and slower to set up than a 3-line or 5-line unit.
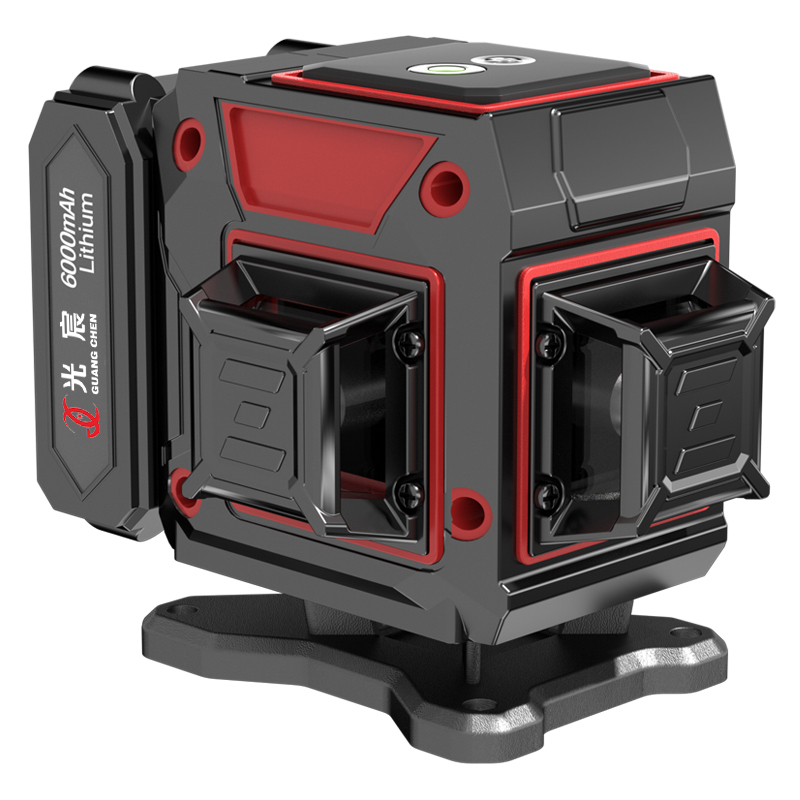 12-Line Laser Level with Green or Red BeamProjects four horizontal and eight vertical lines for drop ceilings, framing, tile, electrical, and cabinetry in commercial or complex layouts.View Product →
Accuracy, Range, and Visibility: What the Numbers Mean
Accuracy and range matter more than brand names, and the stated tolerance should match the distance you actually work at. A laser level rated at ±1/8 inch at 30 feet may drift to ±1/4 inch at 60 feet. If your longest layout is 40 feet, that difference is acceptable for rough framing but not for cabinet installation or tile. Range is another practical limit. Red beams are easier to see indoors and cost less, but they wash out in bright sunlight. Green beams are roughly four times more visible to the human eye, so they work better in large rooms, outdoors, and high-ceiling spaces. The trade-off is shorter battery life. Check the IP rating if you work in dusty or damp conditions. An IP54 rating means the tool is protected against limited dust and water spray, which is a reasonable minimum for a jobsite. Also look at the operating temperature range. Many laser levels work from -10°C to 50°C, but extreme cold can reduce battery performance and affect self-leveling speed.
Self-Leveling vs Manual: When Each Makes Sense
Self-leveling saves time on finished surfaces, while manual or pendulum-lock models survive rough handling and outdoor use better. A self-leveling laser finds level automatically within its compensation range, usually plus or minus 3 to 5 degrees. If you tilt it beyond that range, the beam blinks or shuts off to warn you. This is ideal for remodeling, where floors and walls are close to level but not perfect. Manual laser levels require you to adjust bubble vials before each use. They are slower, but they have fewer internal parts, so they tolerate vibration, drops, and transport in a pickup truck. Many professionals keep a manual model for outdoor site work and a self-leveling model for interior finish. Mounting also matters. A 1/4-inch or 5/8-inch thread on the base lets you attach the laser to a tripod, magnetic bracket, or clamp. Without that thread, you are limited to setting the tool on a flat surface, which is rarely convenient.
How to Set Up and Use a Construction Laser Level Correctly
A laser level is only as accurate as its setup, so check the surface, lock the pendulum during transport, and verify the beam against a known reference before you trust it. Follow these steps for reliable results:
- Place the laser on a stable surface or tripod at the height where you need the line. Avoid vibrating floors or loose materials.
- Check the battery level and unlock the pendulum if the model has a transport lock. Forgetting this step is a common cause of inaccurate lines.
- Aim the tool toward the work area and let it self-level. Wait for the beam to stop blinking or moving.
- Verify accuracy by turning the laser 180 degrees and checking that the line meets the same mark. A quick check on a known level line takes less than a minute.
- Mark your reference points, then double-check critical alignments with a tape measure or a second reference. Do not rely on a single line for structural work.
For a detailed walkthrough, see our article on how to use a laser level. Common mistakes include using a dusty lens, working on a surface that moves, and expecting a red beam to be visible in direct sun. A dirty lens scatters the beam and reduces visibility, so clean it with a soft cloth before each job.
Red vs Green Beams: A Practical Comparison
Green beams are easier to see in bright conditions, but red beams cost less and use less power. The right choice depends on your working environment, not on which color sounds more modern.
| Feature | Red Beam | Green Beam |
|---|---|---|
| Indoor visibility | Good for most rooms | Excellent, even on dark surfaces |
| Outdoor visibility | Poor in sunlight; needs shade | Usable in shade and low sun |
| Power consumption | Lower; longer battery life | Higher; shorter battery life |
| Cost | Generally lower | Generally higher |
| Best use | Interior remodeling, budget jobs | Large rooms, outdoor sites, high ceilings |
Common Buying Risks and How to Avoid Them
The most common mistakes are buying too few lines, ignoring mounting options, and assuming all green beams are equally visible outdoors. Here are the risks to watch for:
- Underbuying line count. A 2-line laser is fine for a single small job, but it will slow you down on multi-wall layouts. Choose 3-line or 5-line for remodeling, and 8-line or more for full-room work.
- No mounting thread or bracket. Without a tripod or magnetic mount, you will improvise with boxes and shelves, which introduces setup error. Check the thread size and whether a bracket is included.
- Overlooking accuracy at distance. A tool rated at ±1/8 inch at 30 feet is not precise enough for long cabinet runs. Match the tolerance to your longest critical layout.
- Ignoring IP rating. Dust and moisture kill laser modules. If you work on active jobsites, look for at least IP54.
- Forgetting battery compatibility. If you already use a cordless tool platform, a laser that shares those batteries saves money and reduces clutter.
Our laser level product line covers 2-line through 16-line models, including self-leveling and manual options, so you can match the tool to the job instead of overbuying. For heavy-duty layout, pair a laser level with a tripod and a magnetic bracket to keep the beam stable.
FAQ
What is the best construction laser level for beginners?
A 3-line self-leveling laser level is the best starting point for most beginners. It gives you one horizontal and two vertical lines, which covers leveling, squaring corners, and basic tile or cabinet layout without a steep learning curve.
Can I use a red laser level outdoors?
Only in shaded areas or at short distances. Red beams wash out in direct sunlight, so for outdoor work, a green beam is a better choice. If you must use red outdoors, work early in the morning or late in the afternoon when the sun is low.
How often should I calibrate my laser level?
Check calibration before any critical job and after a drop or rough transport. A simple field check is to turn the laser 180 degrees and compare the line to a known reference. If the error exceeds the stated tolerance, send the unit for professional calibration.
What does an 8-line laser level mean?
An 8-line laser level typically projects one horizontal plane and four vertical planes, or a similar combination that covers more walls from a single setup. It reduces the number of times you need to move the tool, which saves time on larger rooms.
Final Thoughts
A construction laser level pays for itself by reducing layout time and rework. Choose the line count based on how many walls and ceilings you touch in a typical week, not on the maximum number of lines available. Check the accuracy at your working distance, confirm the mounting thread matches your tripod or bracket, and pick a beam color that suits your lighting conditions. With the right setup and a quick calibration check, a laser level becomes one of the most reliable layout tools on the jobsite.
If you are comparing models, start with the job: small remodels usually need 3 to 5 lines, whole-room layouts need 8 to 12 lines, and commercial work may justify 16 lines. A tool that matches the task will be faster and less frustrating than a high-line-count model you rarely need.